Introduction
In the fast-evolving world of automotive repair, the term “ausbeulstation” has become a cornerstone for workshops aiming to deliver faster, cleaner, and more profitable dent repairs. Whether you manage a high-volume body shop or a mobile service unit, a well-specified ausbeulstation—complete with paintless dent repair (PDR) tools, pulling systems, lighting, and quality control workflows—can dramatically elevate turnaround times and customer satisfaction. In this guide, I unpack what an ausbeulstation is, how it works, and how to choose, install, and optimize one for modern workshop demands.
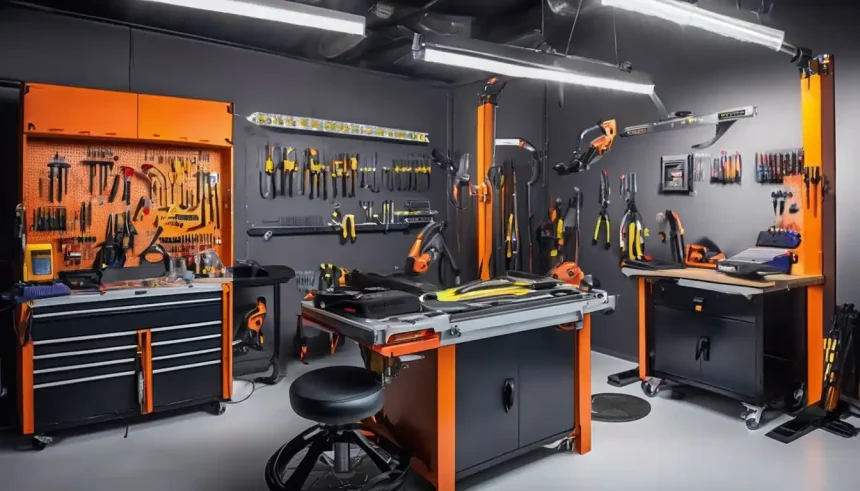
What Is an Ausbeulstation?
An ausbeulstation is a dedicated station in an auto workshop designed specifically for repairing dents, dings, creases, and hail damage with minimal or no paintwork required. While the term is widely used in German-speaking markets, the concept applies globally: it’s the organized, ergonomic hub for streamlined dent correction.
Core Components
- PDR Tools: Lever rods, hooks, and precision tips for working behind panels without damaging paint.
- Glue Pulling Systems: Tabs, glue, lifters, and slide hammers for external pulling when access is limited.
- Stud Welder/Spotter (for painted repairs): For pulling larger or sharp dents when paint correction is planned.
- Lighting: Adjustable LED or fluorescent PDR lights for panel reflection and defect visualization.
- Measurement and Diagnostics: Paint thickness gauges, digital calipers, and panel mapping boards.
- Heating/Cooling: Induction heaters or heat guns to manage paint flexibility and reduce cracking risk.
- Workholding: Panel stands, adjustable clamps, and rubberized supports to secure parts safely.
- Consumables: Glue sticks, release agents, microfiber towels, alcohol, wax and grease remover.
- Safety: Eye protection, gloves, fume extraction for glue and paint vapor, and cable management.
Benefits for Auto Workshops
Faster Cycle Times
An ausbeulstation centralizes tools, lighting, and methods, cutting setup time and movement. For minor dent work, many jobs can be completed within hours rather than days.
Higher Profit Margins
PDR minimizes materials and booth time. With less filler, primer, and paint, your material costs fall while labor can be billed at premium rates due to skill level and speed.
Better Quality and Customer Experience
Maintaining original paint preserves corrosion protection and factory finish. Customers appreciate quick, clean, and eco-friendly repairs, which translates to positive reviews and repeat business.
Flexibility for Hail Events
A properly set-up ausbeulstation can scale for hail seasons by adding mobile PDR techs and extra stations, absorbing spikes in demand without a full booth dependency.
How Paintless Dent Repair Works
PDR is a blend of precision and patience. The technique relies on gradually massaging metal back to its original shape by applying controlled pressure from behind—or pulling from the outside—while carefully monitoring reflections.
Push vs. Pull Techniques
- Pushing: Using rods and picks from the backside, nudging the metal outward in small, controlled movements. Ideal for accessible panels.
- Pulling: Using glue tabs and lifters or slide hammers on the paint surface. Best when backside access is restricted. Glue is removed with alcohol or a release agent after pulling.
Reading the Panel
Good lighting reveals crown areas, lows, and tension lines. I focus on relieving crowns first, then addressing the center low to avoid creating highs or oil-canning.
Heat Management
Heat slightly softens paint and clear coat, reducing cracking risk on deeper or colder panels. I use an induction heater or controlled heat gun to keep temperatures within safe limits.
Setting Up an Ausbeulstation: Step-by-Step
1) Define Your Scope
- What percentage of your monthly work is dent or hail damage?
- Will you perform only PDR, or also conventional repairs involving filler and paint?
- Do you need a static station, a mobile cart, or both?
2) Allocate Space and Power
- Reserve 6–10 square meters of well-lit space with 220–240V access and proper ventilation.
- Ensure enough clearance for doors, hoods, and trunk operation.
- Add wall-mounted tool racks and cable reels for tidy routing.
3) Select Tools and Systems
- Start with a proven PDR kit (rods in multiple lengths, interchangeable tips, whale tails, door hooks).
- Invest in a quality glue-pulling system with a range of tabs (rigid and flexible), glues for different temperatures, and adjustable lifters.
- Add a stud welder/spotter and dent-pulling bridge if you also handle painted repairs.
- Choose an LED PDR light with dimming and color temperature controls to highlight subtle distortions.
4) Safety and Ergonomics
- Use anti-fatigue mats and adjustable stools to reduce strain.
- Implement fume extraction or localized ventilation when using glue, solvents, or heat.
- Provide training on power tool safety, eye protection, and fire risks from heated tools.
5) Workflow and Quality Control
- Create a standard intake process with photos, damage mapping, and paint thickness readings.
- Use a job card to log dent count, size, and locations.
- Establish acceptance criteria: allowable micro-highs/lows, orange peel match, and reflection quality.
- Finish with a clean, polish, and final inspection under cross-lighting.
Choosing the Right Equipment
PDR Rods and Tips
Look for stainless steel rods in various diameters, with interchangeable tips (soft caps, sharp, blunt, rubber, and plastic). Balanced flex and rigidity matter; cheap rods can chatter or mar the panel.
Glue Pulling Tools
A mix of tabs—round, oval, crease, and hail—will cover most damage. For precision, a mini-lifter is gentler; for larger pulls, a slide hammer provides the necessary impulse. Keep multiple glue types matched to ambient temperatures.
Lighting
Reflection quality is everything. I recommend large, stable LED panels with adjustable brightness and color temp (e.g., 4000–6000K). Add a smaller handheld light for close-in work and final checks.
Measuring and Protection
Paint depth gauges help identify repaints that may be brittle. Use masking and edge guards to protect adjacent panels and trim.
Training and Skill Development
PDR is skill-intensive. Even with the best tools, results hinge on technique. Budget for:
- Professional courses (beginner to advanced, including hail)
- Mentored practice on scrap panels
- Certifications that help insurers and fleet clients trust your capabilities
- Regular skill audits and refresher training prior to hail season
Pricing, Packaging, and Profitability
Pricing Models
- Per-dent pricing by size (coin-based) and location complexity
- Hail matrix pricing using industry-standard charts
- Time and materials for mixed-method repairs
Upsell Opportunities
- Headlight restoration, minor scratch polishing, and trim refits
- Protective coatings after repair
- Add-on detailing packages to increase average invoice value
KPI Tracking
- Average repair time per dent/job
- First-time pass rate at QC
- Customer satisfaction and review rates
- Material spend vs. labor revenue
Common Challenges and Solutions
Access Limitations
Remove trim panels, inner liners, or use factory access points. When blocked, switch to glue-pulling with appropriate tabs and controlled heat.
Stretched Metal
If metal is stretched, blending hammers, knockdowns, and controlled shrinking (e.g., cold glue, heat cycles) can help. For severe stretch, plan for conventional repair or panel replacement.
Repainted Panels
Repaints are riskier for PDR due to adhesion variability. Test with a small tab and low-force pull first. Use more heat and gentler techniques.
Aluminum Panels
Aluminum requires more precise, slower pushes and higher heat management. Use rods and tips suitable for aluminum and expect longer repair times.
Digitalization and Documentation
Modern ausbeulstation setups benefit from digital tools:
- Mobile apps for mapping dents, estimating, and before/after images
- Cloud-based job management and invoicing
- QR-coded stations for tool tracking and maintenance logs
Sustainability Considerations
PDR and organized ausbeulstations reduce the need for fillers and paints, lowering VOC emissions and waste. Efficient lighting and smart ventilation further reduce energy use while improving technician comfort.
Implementation Timeline and Budgeting
- Week 1–2: Needs assessment, space planning, and equipment shortlist
- Week 3–4: Procurement and station layout build-out
- Week 5–6: Staff training and pilot jobs
- Week 7+: Full rollout with KPI tracking and iterative improvements
Budget ranges vary widely based on brand choices and scope, but a professional ausbeulstation can start from a modest investment and scale to advanced multi-station setups for high-volume hail work.
FAQs
Is an ausbeulstation only for PDR?
No. While many stations focus on PDR, you can equip them for hybrid repairs involving pulling, filler, and paint when needed.
How long does it take to learn PDR?
Expect a steep learning curve: initial competency in weeks, professional reliability in months, and advanced hail proficiency over one or more seasons.
Can I make it mobile?
Yes. A cart-based ausbeulstation with battery lighting and cordless tools allows on-site repairs for dealerships and fleets.
Conclusion
An ausbeulstation isn’t just a set of tools—it’s a strategic capability. By centralizing equipment, optimizing workflow, and investing in training, you can deliver faster cycle times, higher margins, and happier customers. Start small, design for ergonomics, and scale with demand. Your technicians—and your balance sheet—will thank you.