Today’s drivers expect more from vehicles than the ever before. Between navigating unfamiliar roads, staying connected, and parking safely in tight spaces, a sluggish factory infotainment system can feel like a genuine liability. Most stock car screens lack the processing power, interface polish, and safety features that modern technology now makes possible — leaving drivers frustrated with laggy menus, limited app support, and no reliable way to see what’s behind them.
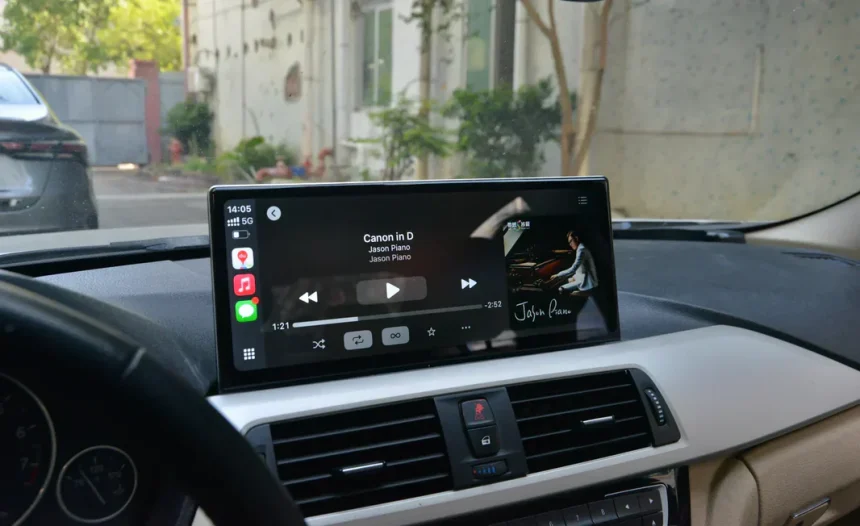
The good news is that upgrading to an aftermarket Apple CarPlay screen with an integrated backup camera is a straightforward solution that transforms your daily drive. You get seamless iPhone connectivity, real-time navigation, hands-free calling, and a clear rear view whenever you shift into reverse. But not all aftermarket screens are created equal.
One of the most important decisions you’ll face is choosing between Android-based and Linux-based operating systems — a choice that affects everything from performance and app compatibility to long-term reliability and cost. This guide walks you through every key consideration, from evaluating operating systems and essential features to matching the right screen with your vehicle and budget, so you can make a confident, informed upgrade.
The Rise of Aftermarket Car Screens: Why Upgrade?
Factory infotainment systems are designed years before a vehicle ever reaches the showroom floor. By the time you drive off the lot, that built-in screen is already behind the curve — running outdated software, offering limited app support, and often lacking a reliable backup camera altogether. For drivers who rely on their phones for navigation, music, and communication, a sluggish OEM system isn’t just inconvenient; it’s a genuine safety concern when it pulls attention away from the road.
Aftermarket Apple CarPlay screens solve these problems directly. Plugging in your iPhone instantly mirrors a familiar, intuitive interface onto the dash, giving you access to Maps, Spotify, Messages, and hundreds of other apps without fumbling with a separate device. The integration feels native rather than bolted on, and voice control through Siri keeps your hands on the wheel.
Beyond connectivity, modern aftermarket units pair seamlessly with high-resolution backup cameras, displaying a wide-angle rear view the moment you shift into reverse — a feature that makes parking in crowded lots and tight driveways significantly safer. For tech-savvy drivers who expect their car’s technology to match everything else in their digital lives, an aftermarket upgrade isn’t a luxury. It’s a practical, meaningful improvement that pays dividends every single day behind the wheel.
Android vs. Linux Screens: A Detailed Comparison
When shopping for an aftermarket Apple CarPlay screen, the operating system running underneath matters more than most buyers realize. Two platforms dominate the market: Android-based systems and Linux-based systems. Android screens leverage the familiar Google ecosystem, offering broad app support and a customizable interface that many users already know.
Linux-based screens, by contrast, are purpose-built for automotive use — stripped of unnecessary overhead and optimized specifically for CarPlay and stability. Understanding how these two platforms differ will directly shape your experience behind the wheel, your long-term satisfaction with the purchase, and ultimately how much you spend to get there.
Performance and User Interface Differences
Android screens typically offer richer visual customization — widgets, themes, and launcher options give power users plenty to work with. However, that flexibility comes with processing overhead, which can introduce occasional lag, especially on budget hardware. Linux-based screens prioritize lean, fast boot times and consistent responsiveness.
Since they run fewer background processes, the CarPlay interface launches almost instantly and touch inputs register without hesitation. For daily drivers who simply want a smooth, reliable experience rather than a tinkerer’s playground, Linux often delivers a cleaner, more predictable feel.
App Compatibility and System Updates
Android screens shine when it comes to native app support — you can run streaming apps, dashcam software, or even offline navigation tools directly on the unit, independent of your iPhone. Updates arrive through familiar channels, though consistency varies by manufacturer. Linux screens are far more limited in standalone app support, but they rarely need updates precisely because there’s less software complexity to maintain.
For tech-savvy users who want a future-proof platform with active third-party development, Android holds the edge. Those who prioritize stability over expandability will find Linux more dependable over time.
Cost and Value for Money Analysis
Android-based screens span a wide price range, from budget units that cut corners on processors and displays to premium options with robust hardware. The variability means you need to research carefully — a cheap Android screen can underperform a mid-range Linux unit significantly. Linux screens tend to cluster in a narrower, mid-to-upper price band, but they deliver more consistent quality for the money since manufacturers invest resources in automotive optimization rather than general-purpose features.
Brands like PEMP Car Audio, for instance, focus their Linux-based lineup specifically on CarPlay performance and camera integration rather than general-purpose computing, which helps explain why purpose-built units often represent better value than comparably priced Android alternatives when reliable daily use is the goal.
Key Features to Look for in an Apple CarPlay Screen
Choosing the right operating system is only the first step. Once you’ve settled on Android or Linux, the real differentiators come down to the hardware and integration features that determine how the screen performs in your specific vehicle every single day. Two areas deserve the most scrutiny: how well the unit integrates with a backup camera, and whether the display itself is built for real-world driving conditions.
Beyond those priorities, it’s worth checking for steering wheel control compatibility, Bluetooth reliability, and whether the unit supports both wired and wireless CarPlay — since wireless connectivity eliminates the cable clutter and lets your phone charge independently. A unit that checks all these boxes will feel like a genuine factory upgrade rather than an afterthought bolted to your dash.
Backup Camera Integration and Quality
Not every CarPlay screen handles backup camera integration equally. Look for units that automatically switch to the rear camera feed the moment you engage reverse — with no manual input required. Camera resolution matters considerably here; a 1080p camera delivers sharp, usable detail in tight parking situations, while lower-resolution options can make it difficult to judge distances accurately.
Night vision capability is another critical factor, especially if you frequently park in poorly lit areas. Wide-angle lenses with at least a 170-degree field of view reduce blind spots significantly. Finally, confirm that the screen’s input supports your camera’s connection type and that the image displays without noticeable lag, which can be disorienting during slow-speed maneuvering.
Screen Resolution and Touch Responsiveness
A high-resolution display — ideally 1280×720 or better — makes a tangible difference when reading navigation maps or glancing at the backup camera feed in bright sunlight. Anti-glare coatings are equally important; a glossy screen that washes out on a sunny afternoon becomes a genuine safety hazard. Touch responsiveness is just as critical as visual quality.
Capacitive touchscreens that register inputs accurately on the first tap keep your eyes off the screen and back on the road faster. Test or research how the unit performs with gloves on if you live in a cold climate, since some screens struggle with insulated touch inputs.
How to Select Based on Your Vehicle and Budget
Even the most feature-rich CarPlay screen becomes a poor investment if it doesn’t fit your dash or work with your car’s existing wiring. his groundwork eliminates the frustration of purchasing a unit that looks perfect online but arrives incompatible with your setup.
Budget planning deserves equal attention: the screen itself is only part of the total cost, and overlooking installation expenses or camera add-ons can push spending well beyond initial expectations. Approaching the selection process systematically — compatibility first, then budget allocation — keeps the upgrade on track and ensures the final result feels like a genuine improvement rather than a compromise.
Assessing Your Car’s Compatibility
Start by measuring your current head unit opening. Most vehicles use either a single-DIN (roughly 2 inches tall) or double-DIN (roughly 4 inches tall) slot, and aftermarket screens almost universally require a double-DIN space. If your car has a single-DIN opening, check whether a dash kit adapter is available for your specific model before proceeding. Next, research your vehicle’s wiring harness — adapter harnesses exist for most makes and models, allowing you to connect an aftermarket unit without cutting factory wires.
Confirm that the screen you’re considering supports your car’s steering wheel control signals, since a separate adapter may be needed to retain those buttons. Checking compatibility forums or manufacturer fitment guides for your exact vehicle year eliminates guesswork entirely.
Setting a Realistic Budget for Aftermarket Products
Think of the total budget in three parts: the screen unit, the backup camera, and installation. A capable mid-range CarPlay screen typically represents the largest portion of spending, while a quality backup camera adds a meaningful but manageable additional cost. If you’re opting for professional installation, factor in labor, which varies by shop and vehicle complexity.
DIY installation saves money but requires purchasing a wiring harness adapter and potentially a dash kit. Prioritize spending on screen quality and camera resolution over cosmetic extras — a sharper display and reliable camera feed deliver daily practical value, while premium finishes are largely aesthetic. Setting a firm ceiling before shopping prevents feature creep from inflating costs beyond what the upgrade genuinely warrants.
Installation Tips and Common Pitfalls
Even a perfectly chosen CarPlay screen can become a headache if the installation goes wrong. Before touching a single wire, disconnect the negative terminal on your battery — this prevents accidental shorts that can damage your vehicle’s electronics or trigger airbag sensors. Lay out all components and confirm you have the correct wiring harness adapter and dash kit for your specific vehicle before starting.
One of the most common mistakes is rushing the wiring stage: mismatched connections cause blown fuses, silent speakers, or a screen that powers on but displays nothing. Take photos of your factory wiring before disconnecting anything, and label each connector as you go. Routing the backup camera cable is another step that trips up first-timers — the wire needs to run from the rear of the vehicle to the head unit without pinching under trim panels or near heat sources.
Test every function — CarPlay connectivity, audio output, steering wheel controls, and the backup camera trigger — before reassembling the dash. Discovering a wiring error after everything is buttoned up means pulling it all apart again.
DIY vs. Professional Installation
DIY installation saves on labor costs and works well for mechanically confident users comfortable with basic wiring. You’ll need a trim removal toolkit, a wiring harness adapter, and patience — expect to spend two to four hours on a first attempt. Professional installation costs more upfront but guarantees clean wiring, proper mounting, and a warranty on the work itself.
For vehicles with complex dash assemblies or integrated factory systems like amplifiers and CANBUS networks, professional installation is genuinely worth the investment to avoid compatibility problems that are difficult to diagnose after the fact.
Ensuring Proper Backup Camera Functionality
Connect the camera’s power wire to a reverse-triggered 12V source — typically the reverse light wire at the tail — so the display activates automatically when you shift into reverse. Run the video cable away from power wires to prevent interference that shows up as static or horizontal lines on the image. Once connected, check the screen’s settings menu to confirm the camera input is assigned correctly and that the reverse trigger wire on the head unit is properly connected.
If the image appears delayed, check for a loose video connection first. Poor night visibility usually points to camera placement rather than a defective unit — repositioning slightly can dramatically improve the image in low light.
Making the Right Choice for a Safer, Smarter Drive
Upgrading to an aftermarket Apple CarPlay screen with a backup camera is one of the most practical improvements you can make to your daily driving experience. But getting it right requires more than picking the first unit that fits your budget.
As this guide has shown, the operating system underneath matters — Android offers flexibility and app breadth, while Linux delivers the lean, consistent performance that most drivers actually need day to day. Beyond the OS, the quality of backup camera integration, display resolution, and touch responsiveness determine whether the upgrade genuinely improves safety or simply adds complexity.
Compatibility with your specific vehicle — dash dimensions, wiring harness, steering wheel controls — must be confirmed before any purchase, and your total budget should account for the screen, camera, and installation together rather than the screen alone. Whether you choose DIY or professional installation, taking the time to wire everything correctly and test all functions before reassembling the dash saves significant frustration later.
The right aftermarket CarPlay screen transforms your car into a connected, safer, and more enjoyable space. Use the criteria and comparisons in this guide to evaluate your options with confidence, match the unit to your vehicle and budget, and drive away knowing you made a well-informed decision that will pay off every time you hit the road.


