What Is an Epoxy Garage Floor?
An epoxy garage floor is more than just a glossy surface — it’s a high-performance coating system that transforms bare concrete into a durable, stain-resistant, and visually striking foundation. Epoxy is a thermosetting polymer formed by mixing resin with a hardener, triggering a chemical reaction that produces a rigid, tightly bonded plastic-like finish. When applied to a garage floor, it creates a protective layer that can withstand vehicle traffic, chemical spills, oil drips, and the daily wear and tear that would quickly degrade untreated concrete.
Homeowners often pursue epoxy flooring for its clean, polished look, but the practical advantages go far deeper than aesthetics. The coating seals the porous concrete beneath, preventing moisture intrusion, resisting stains, and making cleanup remarkably simple. Whether you use your garage for parking, as a workshop, a home gym, or even a recreational space, an epoxy floor elevates both the function and the feel of the room.
Why Epoxy Flooring Has Become So Popular
Over the past decade, epoxy garage floors have surged in popularity among homeowners and property developers alike. Part of the appeal is the sheer transformation — a dull, dusty concrete slab becomes a sleek, showroom-quality surface in a matter of days. But beyond the visual upgrade, several factors are driving the trend.
First, the rise of the multipurpose garage has changed expectations. Garages are no longer just places to park cars. They serve as home offices, workout studios, hobby workshops, and even entertainment zones. Epoxy flooring provides the durability and easy maintenance these uses demand.
Second, the DIY epoxy kit market has made the process more accessible. While professional installation remains the gold standard, homeowners willing to invest time and effort can achieve respectable results with high-quality kits from reputable manufacturers.
Finally, the long-term value proposition is compelling. A properly installed epoxy floor can last 10 to 20 years or more with minimal maintenance, making it one of the most cost-effective flooring upgrades available.
Key Benefits of an Epoxy Garage Floor
Exceptional Durability and Impact Resistance
Epoxy coatings create a surface that is significantly harder and more impact-resistant than bare concrete. Once cured, the floor can handle the weight of vehicles, dropped tools, and heavy equipment without cracking, chipping, or denting. This level of resilience makes epoxy the flooring of choice in commercial garages, warehouses, and industrial facilities — environments where failure isn’t an option.
Chemical and Stain Resistance
One of the most frustrating aspects of an untreated concrete floor is its tendency to absorb oil, gasoline, antifreeze, and other automotive fluids. These spills leave permanent stains that are nearly impossible to remove. Epoxy creates a non-porous barrier that prevents chemicals from penetrating the surface. A quick wipe with a rag or paper towel is usually all it takes to clean up spills before they become problems.
Low Maintenance and Easy Cleaning
Garages collect dust, dirt, and debris. With an epoxy floor, sweeping and occasional damp mopping are generally sufficient to keep the surface looking clean. The seamless finish eliminates the cracks and crevices where grime tends to accumulate, saving homeowners hours of scrubbing compared to bare concrete or tile alternatives.
Enhanced Safety with Slip-Resistant Options
While epoxy can be slippery when wet, especially in glossy finishes, installers can incorporate slip-resistant additives such as aluminum oxide granules or silica sand into the topcoat. These additives create a lightly textured surface that provides reliable traction underfoot, even when the floor is damp. For garage environments where water, oil, or snow melt can create hazardous conditions, this is an essential consideration.
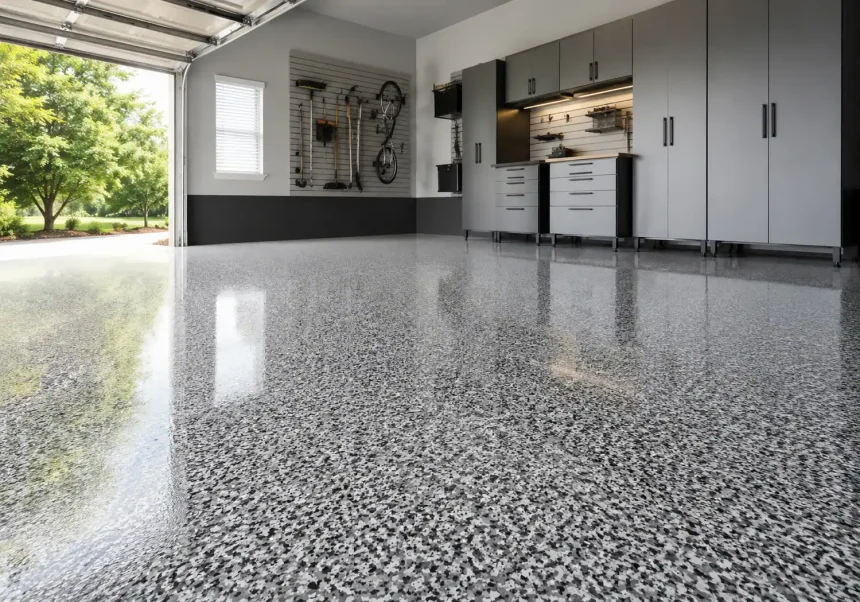
Improved Light Reflectivity and Aesthetics
Epoxy floors are highly reflective, bouncing light around the garage and making the space feel brighter and more open. This is especially valuable in garages with limited natural light or inadequate overhead fixtures. Many homeowners report that after an epoxy installation, their garage simply feels larger and more inviting. The range of color options, metallic pigments, and decorative flake systems available today means the aesthetic possibilities are nearly endless.
Understanding the Costs: What to Expect
Professional Installation Costs
Hiring a professional epoxy flooring contractor typically costs between \$3 and \$12 per square foot, depending on the complexity of the project. A standard single-car garage (roughly 250 square feet) might run anywhere from \$750 to \$3,000, while a larger two-car garage could reach \$1,500 to \$6,000 or more.
Several factors influence the final price:
- Surface preparation: Floors requiring crack repair, leveling, or moisture mitigation will drive up labor costs.
- Coating system complexity: A basic single-coat application costs less than a multi-layer system with primer, base coat, decorative flakes, and a clear topcoat.
- Geographic location: Labor rates vary significantly by region.
- Decorative upgrades: Metallic epoxy, custom color blends, and elaborate flake patterns all add to the total.
DIY Epoxy Kit Costs
For budget-conscious homeowners, DIY epoxy kits offer an alternative. Kits generally range from \$50 to \$200 and can cover a single-car garage depending on the brand and coverage specifications. However, it is important to understand that DIY kits typically use water-based epoxy, which is less durable and has a shorter lifespan than the 100% solids or solvent-based epoxies used by professionals.
The true cost of a DIY project also includes surface preparation tools — concrete grinders or acid etching supplies, crack filler, patching compounds, rollers, squeegees, and protective equipment. These can add \$100 to \$300 to the total.
Cost vs. Value Over Time
When evaluating the investment, consider the lifespan. A professionally installed epoxy floor lasting 15 to 20 years equates to roughly \$100 to \$400 per year for a two-car garage — a reasonable figure for a surface that protects the concrete beneath it, improves the usability of the space, and enhances property appeal.
Types of Epoxy Coating Systems
Water-Based Epoxy
Water-based epoxy is the most common formulation found in DIY kits. It contains lower levels of volatile organic compounds, produces less odor during application, and is easier to work with. The trade-off is reduced durability; water-based coatings are thinner and more susceptible to wear, hot-tire pickup, and chemical damage over time.
Solvent-Based Epoxy
Solvent-based epoxies offer better penetration into the concrete substrate and generally provide a more durable finish than water-based alternatives. They contain higher VOC levels and require more careful handling, including adequate ventilation during application. These are often used in commercial settings and by professional installers.
100% Solids Epoxy
The premium option, 100% solids epoxy, contains no solvents or water. The entire mixture cures into the coating, producing an exceptionally thick, durable, and chemical-resistant surface. This formulation is almost exclusively applied by professionals because it requires precise mixing, has a limited working time before it begins to cure, and demands proper surface preparation to bond correctly.
The Installation Process: Step by Step
Step 1: Surface Preparation
Surface preparation is the single most critical phase of any epoxy installation. The concrete must be clean, dry, and profiled to create a mechanical bond with the epoxy. Professionals typically use diamond grinders or shot blasters to roughen the surface and remove any existing sealers, paint, or contaminants. DIY installers often rely on acid etching with muriatic acid or phosphoric acid solutions, though grinding yields superior results.
Cracks, spalls, and divots must be repaired with epoxy-compatible patching compounds. Moisture testing is also essential at this stage; excessive moisture vapor transmission through the concrete can cause the epoxy to delaminate.
Step 2: Priming
A primer coat serves as the bridge between the concrete and the epoxy base coat. It fills microscopic pores, improves adhesion, and reduces the likelihood of outgassing bubbles forming during the curing process. Not all systems include a primer, but it is strongly recommended for long-term performance.
Step 3: Base Coat Application
The mixed epoxy resin and hardener are applied using rollers and squeegees. At this stage, decorative flakes or chips can be broadcast across the wet surface if desired. The base coat must cure according to manufacturer specifications — typically 12 to 24 hours — before subsequent layers are added.
Step 4: Topcoat and Cure
A clear topcoat, often a polyurethane or polyaspartic formulation, seals the system and provides additional UV stability, chemical resistance, and abrasion protection. Once the topcoat is applied, the floor requires a full cure period — generally 24 to 72 hours for light foot traffic and up to 7 days before vehicle traffic.
Common Mistakes to Avoid
Even high-quality epoxy products can fail if installation mistakes go unchecked. The most frequent errors include:
- Insufficient surface preparation: Skipping grinding or acid etching almost guarantees poor adhesion and premature peeling.
- Ignoring moisture issues: Applying epoxy over damp concrete traps moisture and leads to blistering or delamination.
- Rushing the cure time: Walking or driving on the floor before it has fully cured causes permanent damage.
- Poor mixing: Epoxy must be mixed thoroughly and in the correct ratio. Incomplete mixing leaves uncured, sticky patches.
- Applying too thin: A coat that is too thin will wear through much faster, especially in high-traffic areas.
Epoxy vs. Other Garage Flooring Options
Epoxy vs. Polyaspartic Coatings
Polyaspartic coatings share many characteristics with epoxy but cure much faster — often within hours. They also offer better UV stability, meaning they will not yellow or amber over time when exposed to sunlight. The downside is a shorter working time, which demands experience and speed during application. Many professional installers now use polyaspartic topcoats over epoxy base coats for the best of both worlds.
Epoxy vs. Garage Floor Tiles
Interlocking plastic or rubber tiles provide a DIY-friendly alternative that requires minimal surface preparation. However, they are prone to trapping moisture beneath them, can shift under vehicle loads, and lack the seamless, chemical-resistant properties of epoxy. Tiles generally cost more per square foot than epoxy while delivering less long-term durability.
Epoxy vs. Polished Concrete
Polished concrete is achieved through mechanical grinding and polishing rather than a coating, producing a glossy, low-maintenance surface. While attractive and durable, it does not offer the same chemical resistance as epoxy and will still absorb oil and other fluids if left unsealed.
Is an Epoxy Garage Floor Right for You?
An epoxy garage floor is a significant upgrade that pays dividends in durability, appearance, and ease of maintenance. It suits homeowners who want a long-term flooring solution and are willing to invest either money in a professional installation or time and care into a well-executed DIY project.
If your garage serves as more than just a parking spot — if it is a workshop, a gym, a creative space — epoxy flooring helps the room live up to its potential. The decision ultimately comes down to budget, intended use, and how much value you place on a clean, functional, and visually impressive garage environment. For most, the answer is clear: once you have experienced an epoxy floor, bare concrete never looks the same again.